工作中接触的最多的框架就是 SpringBoot 了,但对它一直处于一种一知半解的状态,就去学习了一下它的源码,接下来几篇文章就来记录一下,也正好加强一下理解。
1
2
3
4
5
6
@SpringBootApplication public class MySpringBootApplication public static void main (String[] args) SpringApplication.run(MySpringBootApplication.class, args); } }
上面的代码就是 SpringBoot 的入口类,从代码上可以看出主要就是调用了 SpringApplication 的 run() 方法,并将我们的启动类作为参数传了进去,下面我们就进到源码里面看看这个run方法。
1
2
3
4
public static ConfigurableApplicationContext run (Class<?>[] primarySources, String[] args) return new SpringApplication(primarySources).run(args); }
可以看到主要分成两步:
构造一个 SpringApplication 的实例
执行实例的 run() 方法
1.构造 SpringApplication 1 2 3 4 5 6 7 8 9 10 11 12 13 14 15 16 17 18 public SpringApplication (Class<?>... primarySources) this (null , primarySources); } public SpringApplication (ResourceLoader resourceLoader, Class<?>... primarySources) this .resourceLoader = resourceLoader; Assert.notNull(primarySources, "PrimarySources must not be null" ); this .primarySources = new LinkedHashSet<>(Arrays.asList(primarySources)); this .webApplicationType = WebApplicationType.deduceFromClasspath(); setInitializers((Collection) getSpringFactoriesInstances(ApplicationContextInitializer.class)); setListeners((Collection) getSpringFactoriesInstances(ApplicationListener.class)); this .mainApplicationClass = deduceMainApplicationClass(); }
在 SpringApplication 的构造器中,主要就做了这么几件事:
存储主程序class
判断当前启动服务的类型(Servlet/Reactive)
设置程序初始化器
设置监听器
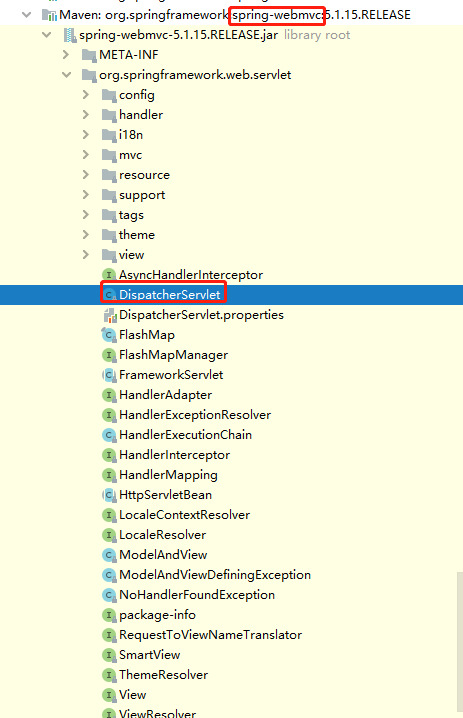
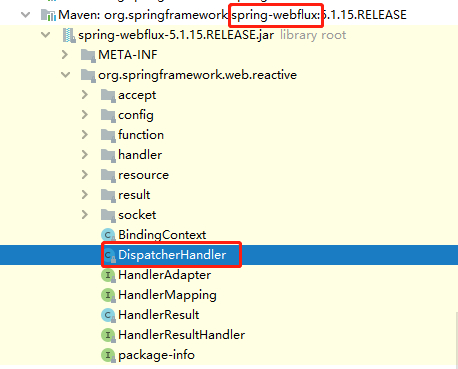
deduceFromClasspath()方法用来判断程序类型1 2 3 4 5 6 7 8 9 10 11 12 13 14 15 16 17 18 19 20 21 22 23 24 static WebApplicationType deduceFromClasspath () if (ClassUtils.isPresent(WEBFLUX_INDICATOR_CLASS, null ) && !ClassUtils.isPresent(WEBMVC_INDICATOR_CLASS, null ) && !ClassUtils.isPresent(JERSEY_INDICATOR_CLASS, null )) { return WebApplicationType.REACTIVE; } for (String className : SERVLET_INDICATOR_CLASSES) { if (!ClassUtils.isPresent(className, null )) { return WebApplicationType.NONE; } } return WebApplicationType.SERVLET; } private static final String[] SERVLET_INDICATOR_CLASSES = { "javax.servlet.Servlet" , "org.springframework.web.context.ConfigurableWebApplicationContext" }; private static final String WEBMVC_INDICATOR_CLASS = "org.springframework." + "web.servlet.DispatcherServlet" ;private static final String WEBFLUX_INDICATOR_CLASS = "org." + "springframework.web.reactive.DispatcherHandler" ;private static final String JERSEY_INDICATOR_CLASS = "org.glassfish.jersey.servlet.ServletContainer" ;
判断服务是 Servlet 还是 Reactive 就是通过下面两个类进行判断
getSpringFactoriesInstances()用于从spring.factories中获取指定类对应的实例在设置初始化器和程序事件监听器时,都调用了getSpringFactoriesInstances(),这个方法主要的功能是从spring.factories中获取指定类对应的实例,初始化器和程序事件监听器就分别从spring.factories中获取ApplicationContextInitializer.class和ApplicationListener.class的实现类
1 2 3 4 5 6 7 8 9 10 11 private <T> Collection<T> getSpringFactoriesInstances (Class<T> type, Class<?>[] parameterTypes, Object... args) { ClassLoader classLoader = getClassLoader(); Set<String> names = new LinkedHashSet<>(SpringFactoriesLoader.loadFactoryNames(type, classLoader)); List<T> instances = createSpringFactoriesInstances(type, parameterTypes, classLoader, args, names); AnnotationAwareOrderComparator.sort(instances); return instances; }
初始化器对应的实例 1 2 3 4 5 6 7 8 9 10 11 12 13 14 15 16 17 18 19 20 21 org.springframework.context.ApplicationContextInitializer=\ org.springframework.boot.context.ConfigurationWarningsApplicationContextInitializer,\ org.springframework.boot.context.ContextIdApplicationContextInitializer,\ org.springframework.boot.context.config.DelegatingApplicationContextInitializer,\ org.springframework.boot.web.context.ServerPortInfoApplicationContextInitializer 程序监听器对应的实例 org.springframework.context.ApplicationListener=\ org.springframework.boot.ClearCachesApplicationListener,\ org.springframework.boot.builder.ParentContextCloserApplicationListener,\ org.springframework.boot.cloud.CloudFoundryVcapEnvironmentPostProcessor,\ org.springframework.boot.context.FileEncodingApplicationListener,\ org.springframework.boot.context.config.AnsiOutputApplicationListener,\ org.springframework.boot.context.config.ConfigFileApplicationListener,\ org.springframework.boot.context.config.DelegatingApplicationListener,\ org.springframework.boot.context.logging.ClasspathLoggingApplicationListener,\ org.springframework.boot.context.logging.LoggingApplicationListener,\ org.springframework.boot.liquibase.LiquibaseServiceLocatorApplicationListener
我们也可以自定义初始化器和程序监听器,只要实现对应的抽象类,并在spring.factories中添加配置即可
2.执行run()方法 SpringApplication 构造完成后,就开始执行其下的 run() 方法,通过8个子步骤完成了 Spring 容器的创建和启动,下面来一个个分析
1 2 3 4 5 6 7 8 9 10 11 12 13 14 15 16 17 18 19 20 21 22 23 24 25 26 27 28 29 30 31 32 33 34 35 36 37 38 39 40 41 42 43 44 45 46 47 48 49 50 51 52 53 54 55 56 57 58 59 60 61 62 63 64 65 66 67 68 69 70 71 72 73 74 75 76 77 78 public ConfigurableApplicationContext run (String... args) StopWatch stopWatch = new StopWatch(); stopWatch.start(); ConfigurableApplicationContext context = null ; Collection<SpringBootExceptionReporter> exceptionReporters = new ArrayList<>(); configureHeadlessProperty(); SpringApplicationRunListeners listeners = getRunListeners(args); listeners.starting(); try { ApplicationArguments applicationArguments = new DefaultApplicationArguments(args); ConfigurableEnvironment environment = prepareEnvironment(listeners, applicationArguments); configureIgnoreBeanInfo(environment); Banner printedBanner = printBanner(environment); context = createApplicationContext(); exceptionReporters = getSpringFactoriesInstances(SpringBootExceptionReporter.class, new Class[] { ConfigurableApplicationContext.class }, context); prepareContext(context, environment, listeners, applicationArguments, printedBanner); refreshContext(context); afterRefresh(context, applicationArguments); stopWatch.stop(); if (this .logStartupInfo) { new StartupInfoLogger(this .mainApplicationClass).logStarted(getApplicationLog(), stopWatch); } listeners.started(context); callRunners(context, applicationArguments); } catch (Throwable ex) { handleRunFailure(context, ex, exceptionReporters, listeners); throw new IllegalStateException(ex); } try { listeners.running(context); } catch (Throwable ex) { handleRunFailure(context, ex, exceptionReporters, null ); throw new IllegalStateException(ex); } return context; }
1. 获取并启动监听器。 1 2 SpringApplicationRunListeners listeners = getRunListeners(args); listeners.starting();
从 spirng.factories 中读取 SpringApplicationRunListener.class 对应的实例,并构造了一个 SpringApplicationRunListeners 来封装这些实例
1 2 3 4 5 6 7 8 9 10 11 private SpringApplicationRunListeners getRunListeners (String[] args) Class<?>[] types = new Class<?>[] { SpringApplication.class, String[].class }; return new SpringApplicationRunListeners(logger, getSpringFactoriesInstances(SpringApplicationRunListener.class, types, this , args)); }
通过查看 spring.factories 发现 SpringApplicationRunListener.class 默认只有一个实例 EventPublishingRunListener
1 2 3 org.springframework.boot.SpringApplicationRunListener=\ org.springframework.boot.context.event.EventPublishingRunListener
EventPublishingRunListener 内部有一个广播器,在构造它时,它会将之前 SpringApplication 初始化时设置的11个监听器添加到这个广播器中
1 2 3 4 5 6 7 8 9 10 11 12 13 private final SimpleApplicationEventMulticaster initialMulticaster;public EventPublishingRunListener (SpringApplication application, String[] args) this .application = application; this .args = args; this .initialMulticaster = new SimpleApplicationEventMulticaster(); for (ApplicationListener<?> listener : application.getListeners()) { this .initialMulticaster.addApplicationListener(listener); } }
监听器执行某个事件时,传入事件对应的类—ApplicationEvent.class的实现类,到监听器的multicastEvent()方法中完成事件的调用。
1 2 3 4 5 6 7 8 9 10 11 12 13 14 15 16 17 18 @Override public void starting () this .initialMulticaster.multicastEvent(new ApplicationStartingEvent(this .application, this .args)); } @Override public void environmentPrepared (ConfigurableEnvironment environment) this .initialMulticaster .multicastEvent(new ApplicationEnvironmentPreparedEvent(this .application, this .args, environment)); } @Override public void contextPrepared (ConfigurableApplicationContext context) this .initialMulticaster .multicastEvent(new ApplicationContextInitializedEvent(this .application, this .args, context)); }
具体的事件执行方法 multicastEvent()
1 2 3 4 5 6 7 8 9 10 11 12 13 14 15 16 17 18 19 20 21 public void multicastEvent (ApplicationEvent event, @Nullable ResolvableType eventType) ResolvableType type = eventType != null ? eventType : this .resolveDefaultEventType(event); Executor executor = this .getTaskExecutor(); Iterator var5 = this .getApplicationListeners(event, type).iterator(); while (var5.hasNext()) { ApplicationListener<?> listener = (ApplicationListener)var5.next(); if (executor != null ) { executor.execute(() -> { this .invokeListener(listener, event); }); } else { this .invokeListener(listener, event); } } }
这个执行方法会接收一个ApplicationEvent,并根据这个 event 来获取对应的监听器 listener ,SpringBoot也自带一些这个类的实例,用来区分执行SpringBoot启动程序的不同阶段。
回过头来看看SpringApplicationRunListeners.class,通过构造一个SpringApplicationRunListeners来对获取到的实例完成一次封装,之后就可以通过SpringApplicationRunListeners统一完成对这些监听器的调用
1 2 3 4 5 6 7 8 9 10 11 12 13 14 15 16 17 18 19 20 21 22 23 24 25 26 27 28 29 30 31 32 33 34 35 36 37 38 39 40 41 42 SpringApplicationRunListeners(Log log, Collection<? extends SpringApplicationRunListener> listeners) { this .log = log; this .listeners = new ArrayList<>(listeners); } public void starting () for (SpringApplicationRunListener listener : this .listeners) { listener.starting(); } } public void environmentPrepared (ConfigurableEnvironment environment) for (SpringApplicationRunListener listener : this .listeners) { listener.environmentPrepared(environment); } } public void contextPrepared (ConfigurableApplicationContext context) for (SpringApplicationRunListener listener : this .listeners) { listener.contextPrepared(context); } } public void contextLoaded (ConfigurableApplicationContext context) for (SpringApplicationRunListener listener : this .listeners) { listener.contextLoaded(context); } } public void started (ConfigurableApplicationContext context) for (SpringApplicationRunListener listener : this .listeners) { listener.started(context); } } public void running (ConfigurableApplicationContext context) for (SpringApplicationRunListener listener : this .listeners) { listener.running(context); } }
SpringApplicationRunListener.class
1 2 3 4 5 6 7 8 9 10 11 12 13 14 15 16 17 18 19 20 21 22 23 24 25 26 27 28 29 30 31 32 33 34 35 36 37 38 39 40 41 42 43 44 45 46 47 48 49 50 51 52 53 54 55 56 57 58 59 60 61 62 63 64 65 66 67 68 69 70 public interface SpringApplicationRunListener void starting () void environmentPrepared (ConfigurableEnvironment environment) void contextPrepared (ConfigurableApplicationContext context) void contextLoaded (ConfigurableApplicationContext context) void started (ConfigurableApplicationContext context) void running (ConfigurableApplicationContext context) void failed (ConfigurableApplicationContext context, Throwable exception) }
2. prepareEnvironment()—准备环境 这里完成的工作主要是配置Spring容器需要的环境信息,比如profile、命令行参数等
1 2 3 4 5 6 7 8 9 10 11 12 13 14 15 16 17 18 19 20 21 private ConfigurableEnvironment prepareEnvironment (SpringApplicationRunListeners listeners, ApplicationArguments applicationArguments) ConfigurableEnvironment environment = getOrCreateEnvironment(); configureEnvironment(environment, applicationArguments.getSourceArgs()); ConfigurationPropertySources.attach(environment); listeners.environmentPrepared(environment); bindToSpringApplication(environment); if (!this .isCustomEnvironment) { environment = new EnvironmentConverter(getClassLoader()).convertEnvironmentIfNecessary(environment, deduceEnvironmentClass()); } ConfigurationPropertySources.attach(environment); return environment; }
根据前面初始化SpringApplication时确定的服务类型webApplicationType配置ConfigurableEnvironment
1 2 3 4 5 6 7 8 9 10 11 12 13 private ConfigurableEnvironment getOrCreateEnvironment () if (this .environment != null ) { return this .environment; } switch (this .webApplicationType) { case SERVLET: return new StandardServletEnvironment(); case REACTIVE: return new StandardReactiveWebEnvironment(); default : return new StandardEnvironment(); } }
通过configureEnvironment()方法完成一些环境的配置,例如profiles
1 2 3 4 5 6 7 8 protected void configureEnvironment (ConfigurableEnvironment environment, String[] args) if (this .addConversionService) { ConversionService conversionService = ApplicationConversionService.getSharedInstance(); environment.setConversionService((ConfigurableConversionService) conversionService); } configurePropertySources(environment, args); configureProfiles(environment, args); }
配置profiles
1 2 3 4 5 6 7 8 9 protected void configureProfiles (ConfigurableEnvironment environment, String[] args) environment.getActiveProfiles(); Set<String> profiles = new LinkedHashSet<>(this .additionalProfiles); profiles.addAll(Arrays.asList(environment.getActiveProfiles())); environment.setActiveProfiles(StringUtils.toStringArray(profiles)); }
下面看一下listeners.environmentPrepared(environment)这行代码,这里执行了监听器的environmentPrepared()方法,表示发布环境已经准备完毕,下面方法与上面的starting()类似,传入了一个ApplicationEnvironmentPreparedEvent事件到广播器中,在广播器中会获取支持这个事件的监听器并依次遍历调用。
1 2 3 4 5 @Override public void environmentPrepared (ConfigurableEnvironment environment) this .initialMulticaster .multicastEvent(new ApplicationEnvironmentPreparedEvent(this .application, this .args, environment)); }
这个阶段获取到的监听器中包含一个叫ConfigFileApplicationListener的监听器,这个监听器主要完成了对properties和yml文件配置的加载,下面会单独讲一讲这个类的执行流程,具体见SpringBoot源码学习(三)—配置环境的构造过程。
3. createApplicationContext()—创建Spring容器 根据webApplicationType来创建Spring容器,web项目对应的服务类型是SERVLET,那么创建的Spring容器即是AnnotationConfigServletWebServerApplicationContext
1 2 3 4 5 6 7 8 9 10 11 12 13 14 15 16 17 18 19 20 21 22 23 24 25 protected ConfigurableApplicationContext createApplicationContext () Class<?> contextClass = this .applicationContextClass; if (contextClass == null ) { try { switch (this .webApplicationType) { case SERVLET: contextClass = Class.forName(DEFAULT_SERVLET_WEB_CONTEXT_CLASS); break ; case REACTIVE: contextClass = Class.forName(DEFAULT_REACTIVE_WEB_CONTEXT_CLASS); break ; default : contextClass = Class.forName(DEFAULT_CONTEXT_CLASS); } } catch (ClassNotFoundException ex) { throw new IllegalStateException( "Unable create a default ApplicationContext, " + "please specify an ApplicationContextClass" , ex); } } return (ConfigurableApplicationContext) BeanUtils.instantiateClass(contextClass); }
4. prepareContext()—准备Spring容器 这一步主要对之前创建的 Spring 容器进行一些配置,例如配置容器环境、执行初始化器等操作
1 2 3 4 5 6 7 8 9 10 11 12 13 14 15 16 17 18 19 20 21 22 23 24 25 26 27 28 29 30 31 32 33 34 35 36 37 38 39 40 private void prepareContext (ConfigurableApplicationContext context, ConfigurableEnvironment environment, SpringApplicationRunListeners listeners, ApplicationArguments applicationArguments, Banner printedBanner) context.setEnvironment(environment); postProcessApplicationContext(context); applyInitializers(context); listeners.contextPrepared(context); if (this .logStartupInfo) { logStartupInfo(context.getParent() == null ); logStartupProfileInfo(context); } ConfigurableListableBeanFactory beanFactory = context.getBeanFactory(); beanFactory.registerSingleton("springApplicationArguments" , applicationArguments); if (printedBanner != null ) { beanFactory.registerSingleton("springBootBanner" , printedBanner); } if (beanFactory instanceof DefaultListableBeanFactory) { ((DefaultListableBeanFactory) beanFactory) .setAllowBeanDefinitionOverriding(this .allowBeanDefinitionOverriding); } Set<Object> sources = getAllSources(); Assert.notEmpty(sources, "Sources must not be empty" ); load(context, sources.toArray(new Object[0 ])); listeners.contextLoaded(context); }
postProcessApplicationContext(),检查并加载容器的一些额外配置
1 2 3 4 5 6 7 8 9 10 11 12 13 14 15 16 17 protected void postProcessApplicationContext (ConfigurableApplicationContext context) if (this .beanNameGenerator != null ) { context.getBeanFactory().registerSingleton(AnnotationConfigUtils.CONFIGURATION_BEAN_NAME_GENERATOR, this .beanNameGenerator); } if (this .resourceLoader != null ) { if (context instanceof GenericApplicationContext) { ((GenericApplicationContext) context).setResourceLoader(this .resourceLoader); } if (context instanceof DefaultResourceLoader) { ((DefaultResourceLoader) context).setClassLoader(this .resourceLoader.getClassLoader()); } } if (this .addConversionService) { context.getBeanFactory().setConversionService(ApplicationConversionService.getSharedInstance()); } }
执行SpringApplication初始化时配置的容器初始化器,初始化器做的工作包括:比如ContextIdApplicationContextInitializer会设置应用程序的id;AutoConfigurationReportLoggingInitializer会给应用程序添加一个条件注解解析器报告等。ApplicationContextInitializer类的initialize()方法,并将自定义的类放入META-INF/spring.factories配置文件中即可
1 2 3 4 5 6 7 8 9 protected void applyInitializers (ConfigurableApplicationContext context) for (ApplicationContextInitializer initializer : getInitializers()) { Class<?> requiredType = GenericTypeResolver.resolveTypeArgument(initializer.getClass(), ApplicationContextInitializer.class); Assert.isInstanceOf(requiredType, context, "Unable to call initializer." ); initializer.initialize(context); } }
5. refreshContext()—容器刷新 Spring容器的刷新 refresh 方法内部会做很多很多的事情:比如BeanFactory的设置、BeanFactoryPostProcessor接口的执行、BeanPostProcessor接口的执行、自动化配置类的解析、条件注解的解析、国际化的初始化等等
1 2 3 4 5 6 7 8 9 10 11 12 13 14 15 16 17 18 19 20 21 22 23 24 25 26 27 28 29 30 31 32 33 34 35 36 37 38 39 40 41 42 43 44 45 46 47 48 49 50 51 52 53 54 55 56 57 58 59 60 61 62 63 64 65 66 67 68 69 70 71 72 73 74 75 76 77 78 79 80 81 82 83 84 85 86 87 88 89 90 91 92 93 94 95 96 97 98 99 100 private void refreshContext (ConfigurableApplicationContext context) refresh(context); if (this .registerShutdownHook) { try { context.registerShutdownHook(); } catch (AccessControlException ex) { } } } protected void refresh (ApplicationContext applicationContext) Assert.isInstanceOf(AbstractApplicationContext.class, applicationContext); ((AbstractApplicationContext) applicationContext).refresh(); } public void refresh () throws BeansException, IllegalStateException synchronized (this .startupShutdownMonitor) { prepareRefresh(); ConfigurableListableBeanFactory beanFactory = obtainFreshBeanFactory(); prepareBeanFactory(beanFactory); try { postProcessBeanFactory(beanFactory); invokeBeanFactoryPostProcessors(beanFactory); registerBeanPostProcessors(beanFactory); initMessageSource(); initApplicationEventMulticaster(); onRefresh(); registerListeners(); finishBeanFactoryInitialization(beanFactory); finishRefresh(); } finally { resetCommonCaches(); } } }
refresh方法在spring整个源码体系中举足轻重,是实现 ioc 和 aop 的关键,下面会单独讲一讲这个刷新过程。
6. afterRefresh()—Spring容器后置处理 这是一个扩展接口,使用了模板方法,默认为空实现。如果有自定义需求,可以重写该方法。比如打印一些启动结束log,或者一些其它后置处理。
1 protected void afterRefresh (ConfigurableApplicationContext context, ApplicationArguments args)
7. 触发结束执行监听事件 1 listeners.started(context);
注意:这里的started()方法执行的是构建好的Spring容器中的publishEvent()方法,与前面的starting()有些许不同
1 2 3 4 5 @Override public void started (ConfigurableApplicationContext context) context.publishEvent(new ApplicationStartedEvent(this .application, this .args, context)); }
不过,可以看到最终还是获取了广播器并调用multicastEvent()方法执行了事件
1 2 3 4 5 6 7 8 9 10 11 12 13 14 15 16 17 18 19 20 21 22 23 24 25 26 27 28 29 30 31 32 33 34 35 36 37 protected void publishEvent (Object event, @Nullable ResolvableType eventType) Assert.notNull(event, "Event must not be null" ); ApplicationEvent applicationEvent; if (event instanceof ApplicationEvent) { applicationEvent = (ApplicationEvent) event; } else { applicationEvent = new PayloadApplicationEvent<>(this , event); if (eventType == null ) { eventType = ((PayloadApplicationEvent<?>) applicationEvent).getResolvableType(); } } if (this .earlyApplicationEvents != null ) { this .earlyApplicationEvents.add(applicationEvent); } else { getApplicationEventMulticaster().multicastEvent(applicationEvent, eventType); } if (this .parent != null ) { if (this .parent instanceof AbstractApplicationContext) { ((AbstractApplicationContext) this .parent).publishEvent(event, eventType); } else { this .parent.publishEvent(event); } } }
8. 执行runners 1 callRunners(context, applicationArguments);
检查Spring容器中是否有ApplicationRunner和CommandLineRunner类型的bean,有的话就遍历他们并执行。我们可以自定义这两个类实现,在程序执行到这一步时就会执行我们自定义的Runners。
1 2 3 4 5 6 7 8 9 10 11 12 13 14 15 16 17 18 19 20 21 22 23 24 25 26 27 28 29 30 31 32 33 34 35 36 37 38 39 40 41 42 43 44 45 46 47 private void callRunners (ApplicationContext context, ApplicationArguments args) List<Object> runners = new ArrayList<>(); runners.addAll(context.getBeansOfType(ApplicationRunner.class).values()); runners.addAll(context.getBeansOfType(CommandLineRunner.class).values()); AnnotationAwareOrderComparator.sort(runners); for (Object runner : new LinkedHashSet<>(runners)) { if (runner instanceof ApplicationRunner) { callRunner((ApplicationRunner) runner, args); } if (runner instanceof CommandLineRunner) { callRunner((CommandLineRunner) runner, args); } } } private void callRunner (ApplicationRunner runner, ApplicationArguments args) try { (runner).run(args); } catch (Exception ex) { throw new IllegalStateException("Failed to execute ApplicationRunner" , ex); } } private void callRunner (CommandLineRunner runner, ApplicationArguments args) try { (runner).run(args.getSourceArgs()); } catch (Exception ex) { throw new IllegalStateException("Failed to execute CommandLineRunner" , ex); } }
最后,在容器启动完成前的最后一刻调用listeners.running(context)方法,通知大家Spring容器启动成功,然后将容器返回。到此为止,Spring容器的启动流程分析就结束了。