最近在着手 APP 上架 App Store 的事儿,苹果要求 App 内的支付功能要对接 IAP 支付,本篇文章就记录一下对接过程中踩过的坑。
方案调查 App 端支付成功后,苹果服务器会直接返回支付结果给 App 端,这时 App 端需要根据拿到的支付结果请求服务端,服务端 请求苹果服务器验证支付结果的有效性 。
调查发现 服务端验证支付结果的有效性 有下面几种方式可以使用:
服务端验证 receipt。 App 支付成功,拿到苹果服务器返回的 receipt 数据,请求服务端,服务端根据 Receipt 进行验证。网上的大部分处理方案都是这种,但这种方式已被标记为 Deprecated。文档地址:appstorereceipts 服务端请求 App Store Server Api 验证 TransactionId。 App 支付成功,拿到苹果服务器返回的 TransactionId 数据,请求服务端,服务端请求 App Store Server API 获取具体的交易结果。文档地址:appstoreserverapi 等待 Apple 服务器的异步回调。 预想的是 App 支付成功,无需再请求服务端,服务端等待 Apple 服务器的异步回调(与 支付宝支付、微信支付 的处理一样)。但在和 App 端对接时,发现这种方式不可行。Apple 服务器回调的支付信息,只携带了 Apple 内定义的交易号(TransactionId),服务端收到这个回调,无法确定属于哪一个订单。因此 App 支付成功后,必须请求服务端,服务端将苹果返回的 TransactionId 和订单绑定。文档地址:app_store_server_notifications_v2
因此最终有如下几种处理方式:
App 拿到苹果支付成功的回调后,请求服务端,服务端进行支付结果校验,校验通过,直接处理后续发放权益的逻辑。App 拿到苹果支付成功的回调后,请求服务端,服务端进行支付结果校验,将 TransactionId 和订单ID绑定。发放权益的逻辑在收到苹果支付回调后再处理。
根据 Receipt 进行验证 App Store Receipts
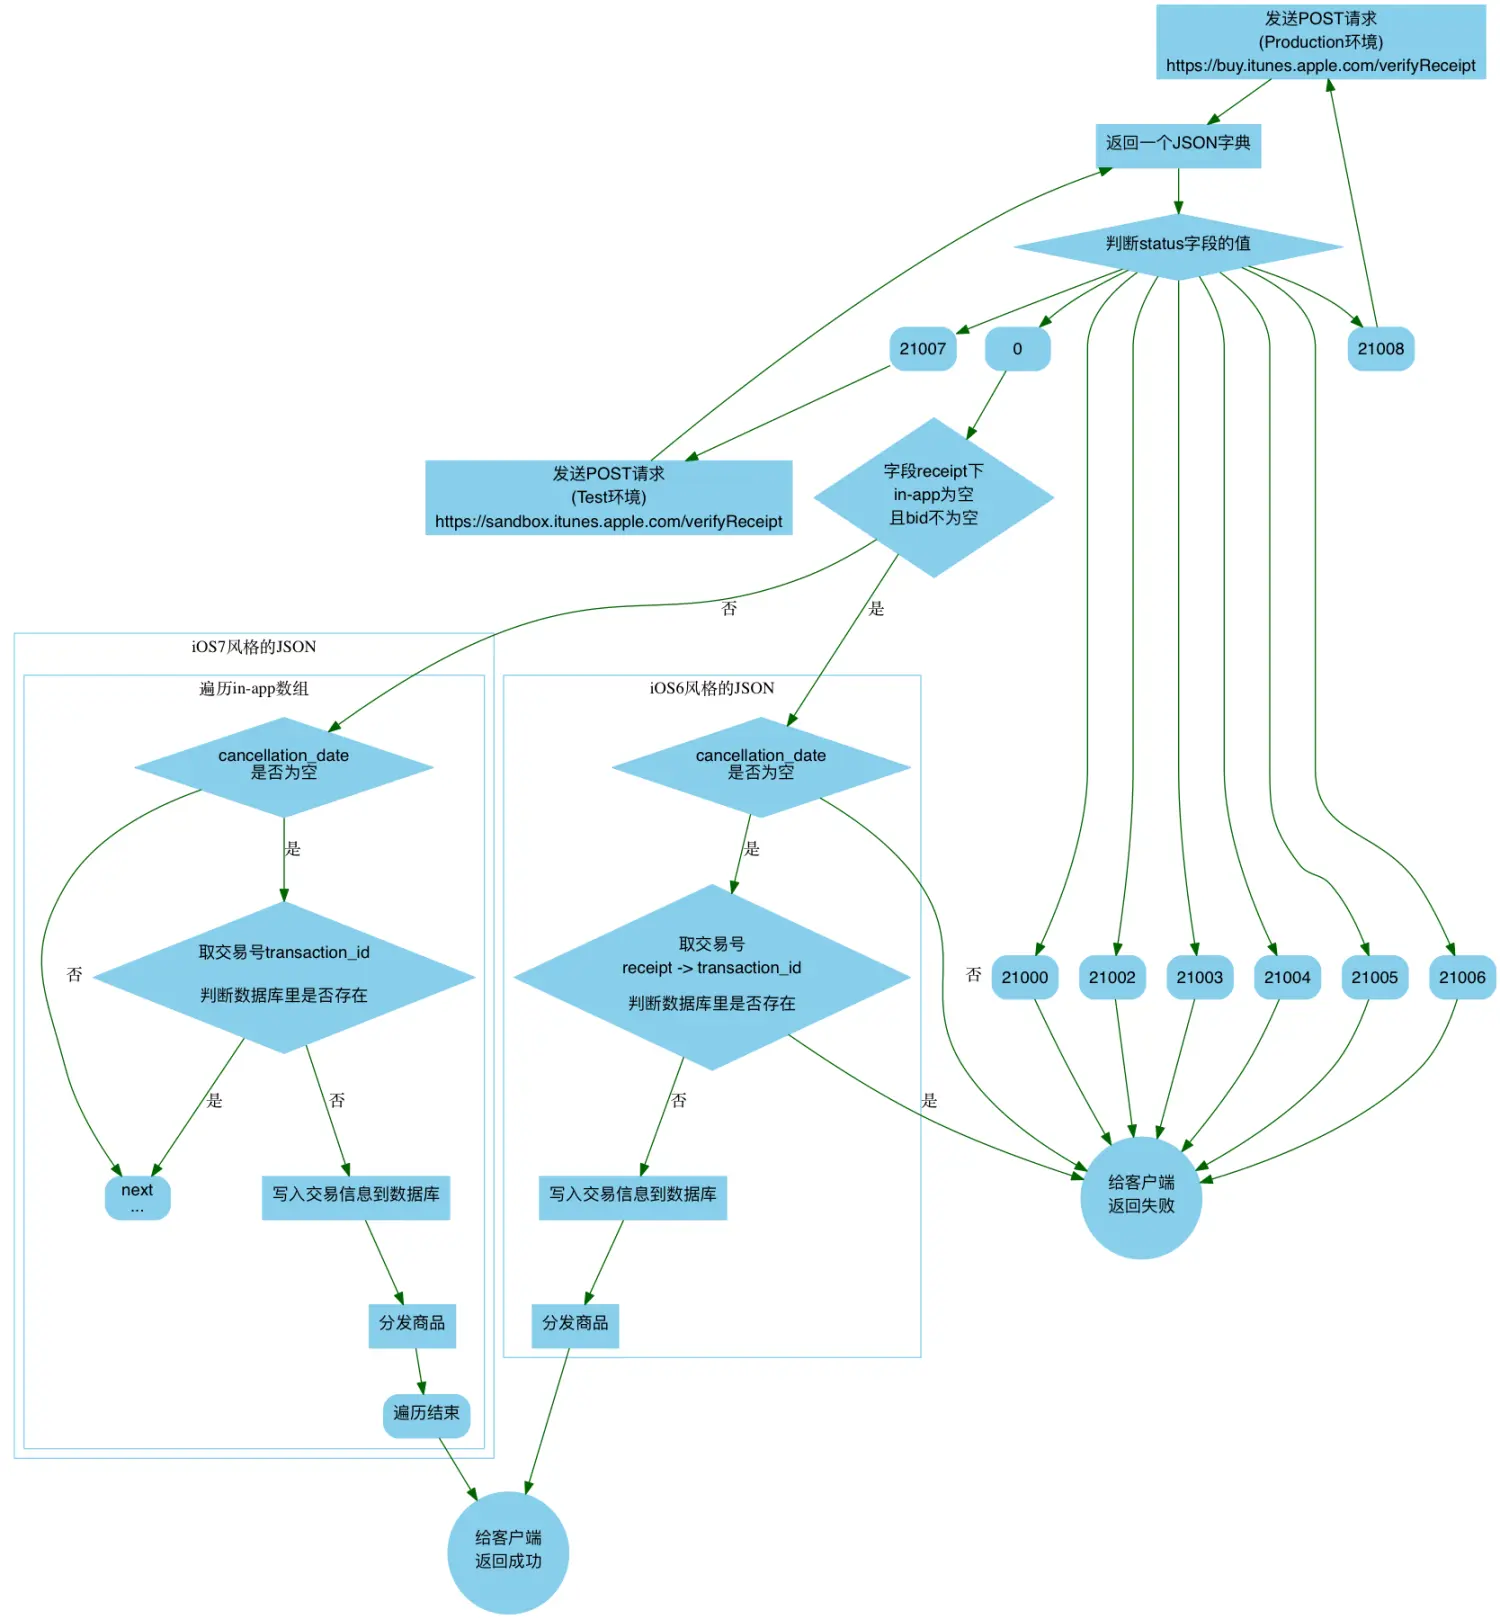
首先是根据 Receipt 进行验证,Receipt 是 App 支付成功后由苹果服务器返回的,服务端拿到 Receipt 请求 verifyReceipt 接口:verifyReceipt - 官方文档 。
相关的代码如下:
1
2
3
4
5
6
7
8
9
10
11
12
13
14
15
16
17
18
19
20
21
22
23
24
25
26
27
28
29
30
31
32
33
34
35
36
37
38
39
40
41
42
43
44
45
46
47
48
49
50
51
52
53
54
55
56
57
58
59
60
61
62
63
64
65
66
67
68
69
70
71
72
73
74
75
76
77
78
79
80
81
82
83
84
85
86
87
88
89
90
91
92
93
94
95
96
97
98
99
100
101
102
103
104
105
106
107
108
109
110
111
112
113
114
115
116
117
118
119
120
@Api(tags = "001 苹果支付", description = "ApplePayController") @RestController @RequestMapping("applePay") public class ApplePayController extends BaseController private static final String certificateUrl = "https://buy.itunes.apple.com/verifyReceipt" ; private static final String certificateUrlTest = "https://sandbox.itunes.apple.com/verifyReceipt" ; private static final Logger log = LoggerFactory.getLogger(ApplePayController.class); @PostMapping("/verifyApplePayResult") @ApiImplicitParams({ @ApiImplicitParam(paramType="header", name = "authorization", value = "token", required = true, dataType = "String"), @ApiImplicitParam(paramType="query", name = "receipt", value = "苹果传递前端支付成功的值", required = true, dataType = "String"), @ApiImplicitParam(paramType="query", name = "envType", value = "默认0 0:真实环境 1:沙箱环境", required = true, dataType = "int") }) @LogAnnotation(actionname = "苹果支付结果验证",module = "苹果支付",actiontype = "POST") public ResponseMessage verifyApplePayResult (@RequestParam String receipt, @RequestParam int envType) log.info("开始验证苹果支付结果:{}" , receipt); String url = (envType == 0 ) ? certificateUrl : certificateUrlTest; Object object = doVerifyApplePayResult(url, receipt); return new ResponseMessage("处理成功!" , object); } private Object doVerifyApplePayResult (String url, String receipt) try { String result = sendRequestToAppleServer(url, receipt); log.info("苹果服务器回调响应:{}" , result); JSONObject appleResponse = JSONObject.parseObject(result); String status = appleResponse.getString("status" ); if ("0" .equals(status)) { JSONArray jsonArray = appleResponse.getJSONObject("receipt" ).getJSONArray("in_app" ); for (Object object : jsonArray) { JSONObject jsonObject = (JSONObject) object; String transactionId = jsonObject.getString("transaction_id" ); String productId = jsonObject.getString("product_id" ); String quantity = jsonObject.getString("quantity" ); } } else if ("21007" .equals(status)) { } else { } } catch (Exception e) { log.error("请求苹果服务器验证发生异常!" , e); } return null ; } private String sendRequestToAppleServer (String url, String receipt) throws Exception HostnameVerifier hv = (hostname, session) -> true ; trustAllHttpsCertificates(); HttpsURLConnection conn = (HttpsURLConnection) new URL(url).openConnection(); conn.setHostnameVerifier(hv); conn.setRequestMethod("POST" ); conn.setDoOutput(true ); conn.setRequestProperty("Content-type" , "application/json" ); JSONObject obj = new JSONObject(); obj.put("receipt-data" , receipt); BufferedOutputStream buffOutStr = new BufferedOutputStream(conn.getOutputStream()); buffOutStr.write(obj.toString().getBytes()); buffOutStr.flush(); buffOutStr.close(); BufferedReader reader = new BufferedReader(new InputStreamReader(conn.getInputStream())); StringBuilder sb = new StringBuilder(); String line = null ; while ((line = reader.readLine()) != null ) { sb.append(line); } return sb.toString(); } private void trustAllHttpsCertificates () throws Exception TrustManager[] trustAllCerts = new TrustManager[] { new X509TrustManager() { public void checkClientTrusted (X509Certificate[] chain, String authType) public void checkServerTrusted (X509Certificate[] chain, String authType) public X509Certificate[] getAcceptedIssuers() { return null ; } } }; SSLContext sc = SSLContext.getInstance("SSL" ); sc.init(null , trustAllCerts, null ); HttpsURLConnection.setDefaultSSLSocketFactory(sc.getSocketFactory()); } }
根据 Receipt 进行校验存在一个坑,receipt 解析出的交易信息存在两种格式,因此在处理交易信息时需要同时考虑这两种格式的数据,具体参考文章:谈谈苹果应用内支付(IAP)的坑
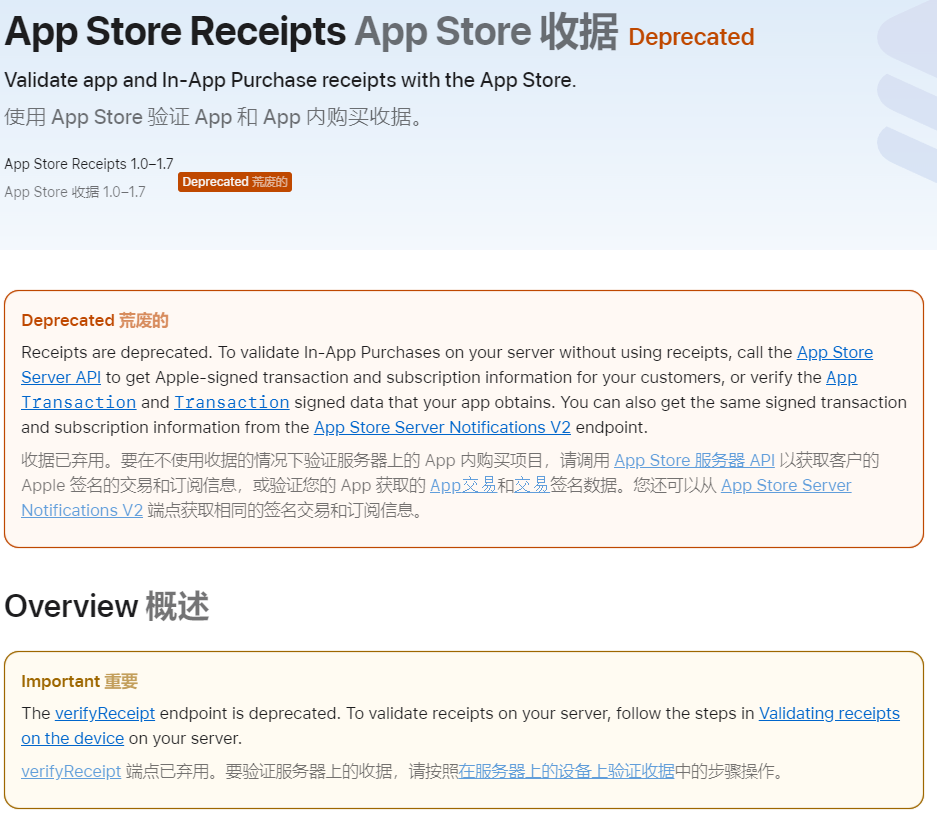
在对接过程中发现 verifyReceipt 方法已被弃用,并且根据 Receipt 进行验证的方式也被弃用了,如下:
按照文档中的提示,可以使用 Validating receipts with the App Store 这种方式替代已被弃用的 verifyReceipt 。但是根据上面的提示,根据 Receipts 进行验证这种方式已经被弃用了,可以使用 App Store Server API 或者 App Store Server Notifications V2 进行接入 ,因此这里就不再验证 Validating receipts with the App Store 这种接入方式了。
根据 App Store Server API 进行验证 App Store Server API
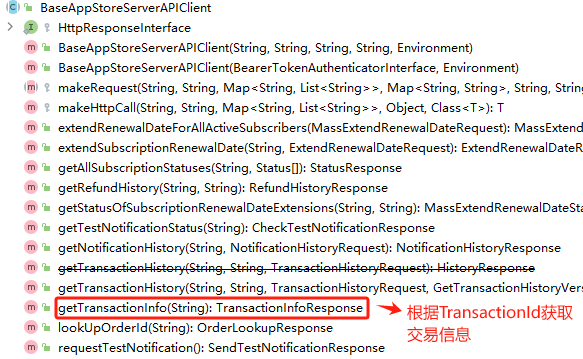
根据文档的指引,可以通过请求 Get Transaction Info 接口来获取交易信息。上面说过,App端支付完成后,Apple服务器会返回支付结果给App端,返回结果除了上面的 receipt 外,还包含一个 TransactionId,这是苹果定义的交易ID,服务端拿到这个 TransactionId 去请求 Get Transaction Info 接口获取具体的交易信息即可。
直接在上面 verifyReceipt 相关的代码基础上进行调整,但是直接请求会报 401 异常,如下:
继续看文档,发现需要构建 JWT 令牌:
在 Generating JSON Web Tokens for API requests 这篇文档中,有完整的构建 JWT的指引。但文档中提到,苹果提供了官方库来简化这个操作:
在 Simplifying your implementation by using the App Store Server Library 这篇文档中提到,可以使用 app-store-server-library 这个库来简化流程。阅读这个库的源码后发现,App Sotre Server API 中的接口请求在这个库中都封装好了,只需要提供必要的配置参数调用对应的方法即可。
但这个库仅支持 Java 11+ 项目,我们的项目是 Java 8,因此无法使用,引入之后打包时会出现如下报错:
因此只能自己再造一次轮子了,直接在 app-store-server-library 库的代码基础上进行改造,代码如下:
1 2 3 4 5 6 7 8 9 10 11 12 13 14 15 16 17 18 19 20 21 22 23 24 25 26 27 28 29 30 31 32 33 34 35 36 37 38 39 40 41 42 43 44 45 46 47 48 49 50 51 52 53 54 55 56 57 58 59 60 61 62 63 64 65 66 67 68 69 70 71 72 73 74 75 76 77 78 79 80 81 82 83 84 85 86 87 88 89 90 91 92 93 94 95 96 97 98 99 100 101 102 103 104 105 106 107 108 109 110 111 112 113 114 115 116 117 118 119 120 121 122 123 124 125 126 127 128 129 130 131 132 133 134 135 136 137 138 139 private JSONObject verifyTransactionFromAppleServer (String transactionId) throws Exception String keyId = "xxxxx" ; String issuerId = "xxxxxx-ccccc-bbbb-xxx-aaaaa" ; String bundleId = "xxx" ; String signedTransactionInfo = getTransactionInfo(transactionId, generateJWT(keyId, issuerId, bundleId)); log.info("获取到的Transaction信息: {}" , signedTransactionInfo); JSONObject transactionInfo = verifyAndGet(signedTransactionInfo); log.info("解签后的信息:{}" , transactionInfo); return transactionInfo; } public String getTransactionInfo (String transactionId, String jwt) throws IOException URL url = new URL(getTransactionUrlTest + transactionId); HttpsURLConnection connection = (HttpsURLConnection) url.openConnection(); connection.setRequestMethod("GET" ); connection.setRequestProperty("Authorization" , "Bearer " + jwt); connection.setRequestProperty("Accept" , "application/json" ); connection.setDoOutput(true ); int responseCode = connection.getResponseCode(); if (responseCode == HttpsURLConnection.HTTP_OK) { try (BufferedReader in = new BufferedReader(new InputStreamReader(connection.getInputStream()))) { String inputLine; StringBuilder response = new StringBuilder(); while ((inputLine = in.readLine()) != null ) { response.append(inputLine); } JSONObject jsonObject = JSONObject.parseObject(response.toString()); return jsonObject.getString("signedTransactionInfo" ); } } else { throw new RuntimeException("请求Apple Server获取交易信息失败!code: " + responseCode); } } public String generateJWT (String keyId, String issuerId, String bundleId) throws Exception InputStream keyInputStream = getClass().getClassLoader().getResourceAsStream("appleRootCertificates/AuthKey_79Y987YU9N.p8" ); String encodedKey = readInputStreamToString(keyInputStream).replace("-----BEGIN PRIVATE KEY-----" , "" ) .replace("-----END PRIVATE KEY-----" , "" ) .replaceAll("\\s+" , "" ); byte [] pkcs8EncodedKey = Base64.getDecoder().decode(encodedKey); PKCS8EncodedKeySpec keySpec = new PKCS8EncodedKeySpec(pkcs8EncodedKey); KeyFactory keyFactory = KeyFactory.getInstance("EC" ); PrivateKey privateKey = keyFactory.generatePrivate(keySpec); Map<String, Object> claimsMap = new HashMap<>(); claimsMap.put("bid" , bundleId); return Jwts.builder() .setAudience("appstoreconnect-v1" ) .setExpiration(DateUtils.plusMinute(5 , new Date())) .setIssuer(issuerId) .setHeaderParam("kid" , keyId) .addClaims(claimsMap) .signWith(SignatureAlgorithm.ES256, privateKey) .compact(); } private String readInputStreamToString (InputStream inputStream) throws IOException StringBuilder content = new StringBuilder(); try (BufferedReader reader = new BufferedReader(new InputStreamReader(inputStream))) { String line; while ((line = reader.readLine()) != null ) { content.append(line).append(System.lineSeparator()); } } return content.toString(); } public JSONObject verifyAndGet (String signedPayload) DecodedJWT decodedJWT = JWT.decode(signedPayload); String header = new String(Base64.getUrlDecoder().decode(decodedJWT.getHeader())); String x5c = JSONObject.parseObject(header).getJSONArray("x5c" ).getString(0 ); PublicKey publicKey = getPublicKeyByX5c(x5c); Algorithm algorithm = Algorithm.ECDSA256((ECPublicKey) publicKey, null ); try { algorithm.verify(decodedJWT); } catch (SignatureVerificationException e) { throw new RuntimeException("签名验证失败!" , e); } return JSONObject.parseObject(new String(Base64.getDecoder().decode(decodedJWT.getPayload()))); } private PublicKey getPublicKeyByX5c (String x5c) byte [] x5c0Bytes = Base64.getDecoder().decode(x5c); try { CertificateFactory fact = CertificateFactory.getInstance("X.509" ); X509Certificate cer = (X509Certificate) fact.generateCertificate(new ByteArrayInputStream(x5c0Bytes)); return cer.getPublicKey(); } catch (CertificateException e) { throw new RuntimeException("签名验证失败!" , e); } }
需要引入下面两个依赖:
1 2 3 4 5 6 7 8 9 10 <dependency > <groupId > io.jsonwebtoken</groupId > <artifactId > jjwt</artifactId > <version > 0.9.0</version > </dependency > <dependency > <groupId > com.auth0</groupId > <artifactId > java-jwt</artifactId > <version > 4.4.0</version > </dependency >
生成的 JWT的处理,我这里使用的是 io.jsonwebtoken:jjwt 库,而 app-store-server-library 库中用的是 com.auth0:java-jwt 库。之所以这么处理,是因为 com.auth0:java-jwt 库在我项目中存在依赖冲突,会导致生成 JWT 时出现报错(但解析是正常,之后又有时间深入调查下,依赖冲突的问题应该可以修复)。
使用 app-store-server-library 库 在项目中引入这个库
1 2 3 4 5 <dependency > <groupId > com.apple.itunes.storekit</groupId > <artifactId > app-store-server-library</artifactId > <version > 3.1.0</version > </dependency >
这个库的 README.md 中已经提供了示例,我们在它提供的示例代码上进行调整即可,下面是获取交易请求相关的代码:
1
2
3
4
5
6
7
8
9
10
11
12
13
14
15
16
17
18
19
20
21
22
23
24
25
26
27
28
29
import com.apple.itunes.storekit.client.APIException;import com.apple.itunes.storekit.client.AppStoreServerAPIClient;import com.apple.itunes.storekit.model.Environment;import com.apple.itunes.storekit.model.SendTestNotificationResponse;import java.io.IOException;import java.nio.file.Files;import java.nio.file.Path;public class APIExample public static void main (String[] args) throws Exception String issuerId = "99b16628-15e4-4668-972b-eeff55eeff55" ; String keyId = "ABCDEFGHIJ" ; String bundleId = "com.example" ; Path filePath = Path.of("/path/to/key/SubscriptionKey_ABCDEFGHIJ.p8" ); String encodedKey = Files.readString(filePath); Environment environment = Environment.SANDBOX; AppStoreServerAPIClient client = new AppStoreServerAPIClient(encodedKey, keyId, issuerId, bundleId, environment); try { SendTestNotificationResponse response = client.getTransactionInfo("xxx" ); System.out.println(response); } catch (APIException | IOException e) { e.printStackTrace(); } } }
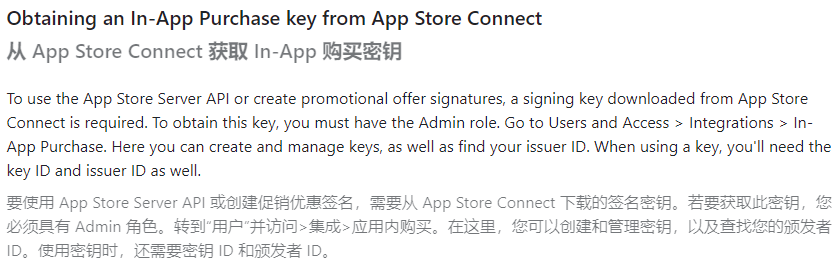
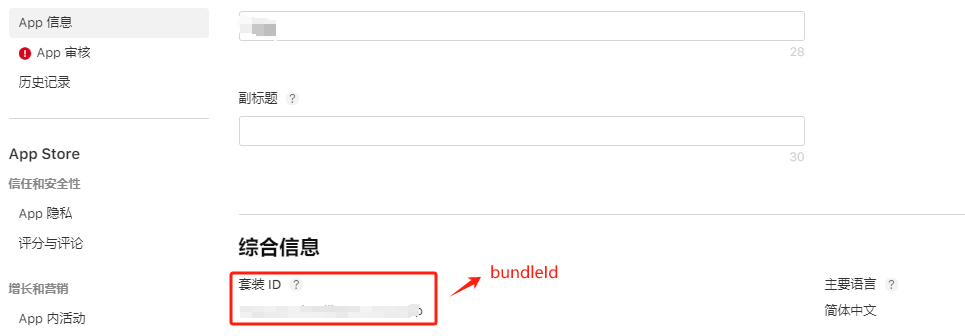
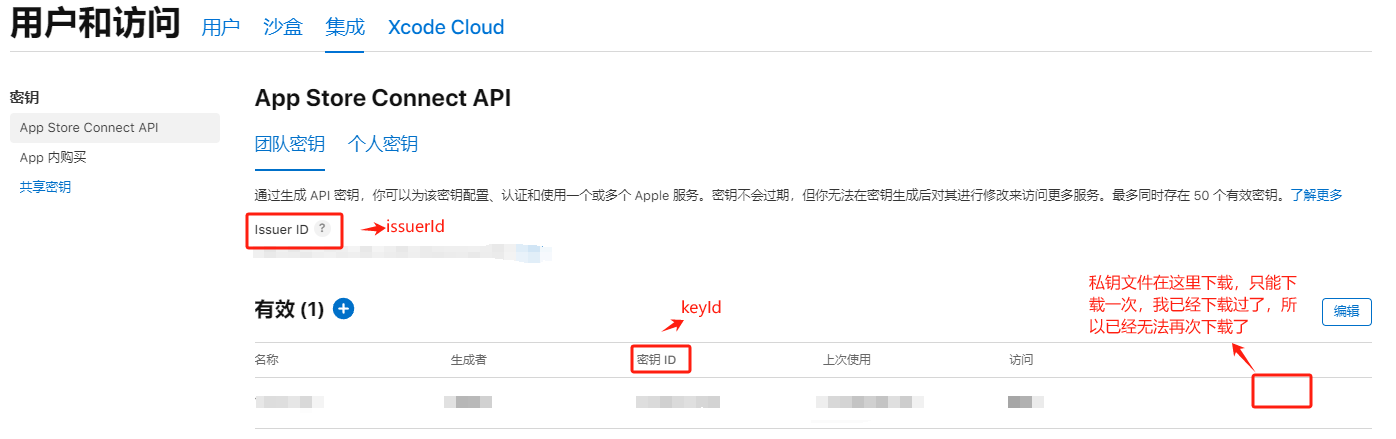
其中我们要提供几个参数:issuerId、keyId、SubscriptionKey_ABCDEFGHIJ.p8 私钥证书文件、bundleId
bundleId 是 iOS 应用的唯一标识符,可以在下面拿到
剩下3个参数需要配置 App Store Connect API 密钥,如下:
请求 Apple Server 拿到的交易信息还需要进行解签,解签方法如下:
1
2
3
4
5
6
7
8
9
10
11
12
13
14
15
16
17
18
19
20
21
22
23
24
25
26
27
28
29
30
31
import com.apple.itunes.storekit.model.Environment;import com.apple.itunes.storekit.model.ResponseBodyV2DecodedPayload;import com.apple.itunes.storekit.verification.SignedDataVerifier;import com.apple.itunes.storekit.verification.VerificationException;import java.io.FileInputStream;import java.io.InputStream;import java.util.Set;public class ExampleVerification public static void main (String[] args) String bundleId = "com.example" ; Environment environment = Environment.SANDBOX; Set<InputStream> rootCAs = Set.of( new FileInputStream("/path/to/rootCA1" ), new FileInputStream("/path/to/rootCA2" ) ); Long appAppleId = null ; SignedDataVerifier signedPayloadVerifier = new SignedDataVerifier(rootCAs, bundleId, appAppleId, environment, true ); String notificationPayload = "ey..." ; try { ResponseBodyV2DecodedPayload payload = signedPayloadVerifier.verifyAndDecodeNotification(notificationPayload); System.out.println(payload); } catch (VerificationException e) { e.printStackTrace(); } } }
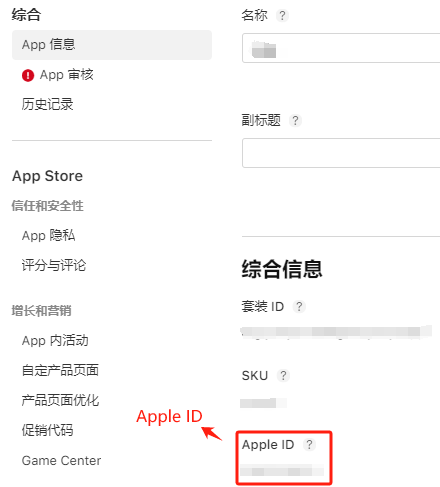
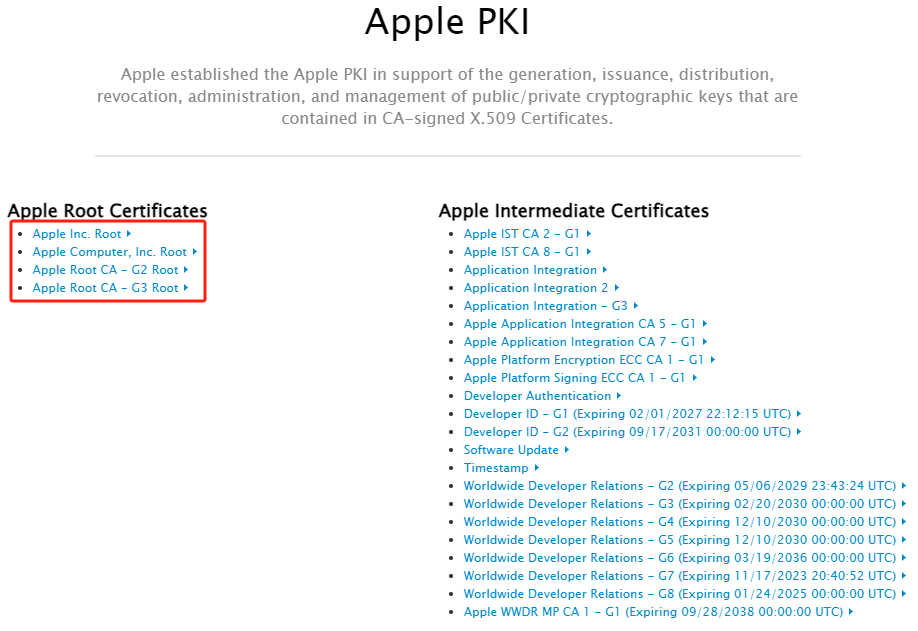
这个方法要求我们提供 Apple Root Certificates 和 Apple ID,Apple ID 在下面拿到:
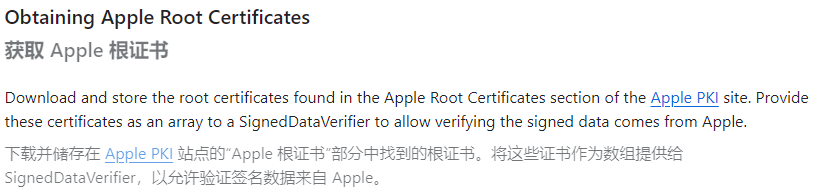
Apple Root Certificates直接去 Apple PKI 下载即可
下面放上完整的代码:根据 App 端提供的 TransactionId,请求 Apple Server 获取对应的交易信息,并进行解签
1
2
3
4
5
6
7
8
9
10
11
12
13
14
15
16
17
18
19
20
21
22
23
24
25
26
27
28
29
30
31
32
33
34
35
public class Main public static void main (String[] args) throws Exception Main main = new Main(); main.getTransactionThrowApple("2000000690856066" ); } private void getTransactionThrowApple (String transactionId) throws IOException, APIException, VerificationException String keyId = "xxx" ; String issuerId = "aaaa-01b6-480c-ccccc-dddddd" ; String bundleId = "xxxxxxx" ; Long appleId = 1562213344L ; Path filePath = Path.of("E://AuthKey_xxx.p8" ); String encodedKey = Files.readString(filePath); Environment environment = Environment.SANDBOX; Set<InputStream> rootCAs = Set.of( new FileInputStream("E://AppleComputerRootCertificate.cer" ), new FileInputStream("E://AppleIncRootCertificate.cer" ), new FileInputStream("E://AppleRootCA-G2.cer" ), new FileInputStream("E://AppleRootCA-G3.cer" ) ); AppStoreServerAPIClient client = new AppStoreServerAPIClient(encodedKey,keyId,issuerId,bundleId,environment); TransactionInfoResponse sendResponse = client.getTransactionInfo(transactionId); Long appAppleId = null ; Boolean onlineChecks = false ; SignedDataVerifier signedDataVerifier = new SignedDataVerifier(rootCAs,bundleId,appAppleId,environment, onlineChecks); String signedPayLoad = sendResponse.getSignedTransactionInfo(); JWSTransactionDecodedPayload payload = signedDataVerifier.verifyAndDecodeTransaction(signedPayLoad); } }
苹果服务器的异步回调 App Store Server Notifications V2
苹果的异步回调无法携带 [用户自定义的订单ID],不太理解苹果这么设计异步回调的意义,支付宝和微信的异步回调都可以携带这些信息。如果回调信息中携带了这个值,那么 App 支付成功后就无需再请求服务端了,App 支付成功后还必须去请求服务端将 [苹果交易ID] 和 [自定义订单] 绑定,既然已经有了异步通知,那这一步操作总觉得有些多余。(之后可以调查一下苹果这么设计的原因 )
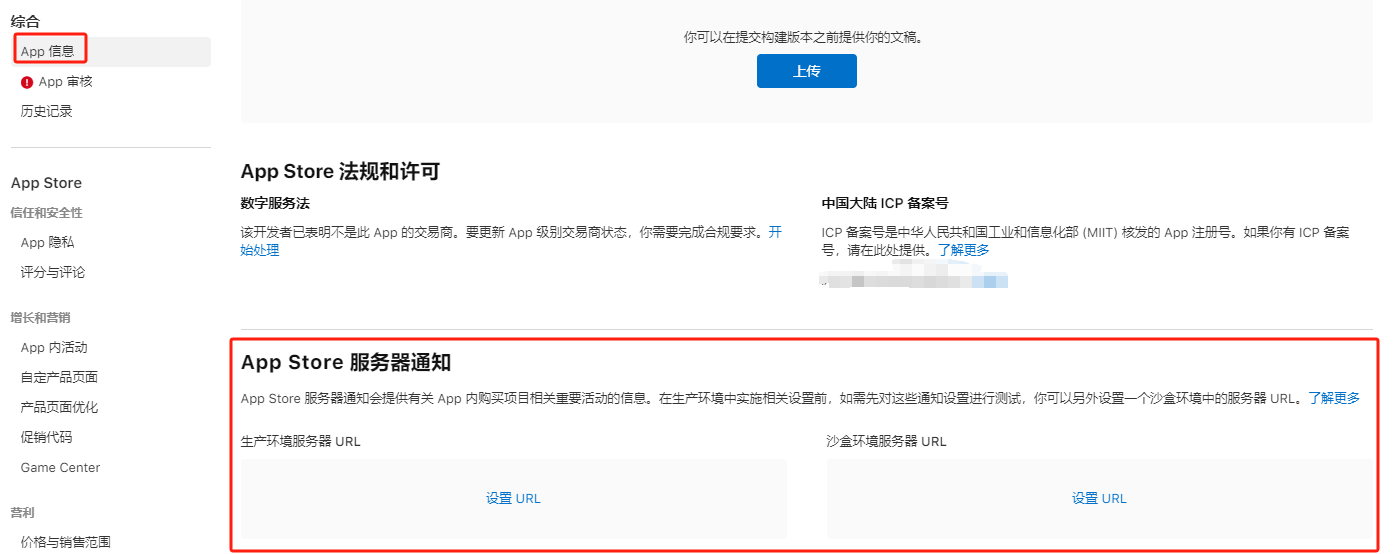
下面看一下如何在服务端实现接收 Apple Server 的异步回调,首先需要配置服务器通知地址,配置方式见:Enter server URLs for App Store Server Notifications
然后就是服务端代码,参考文档:使用Java接入苹果内购流程(附主要代码)
1 2 3 4 5 6 7 8 9 10 11 12 13 14 15 16 17 18 19 20 21 22 23 24 25 26 27 28 29 30 31 32 33 34 35 36 37 38 39 40 41 42 43 44 45 46 47 48 49 50 51 52 53 54 55 56 57 58 59 60 61 62 63 64 65 66 67 68 69 70 71 72 73 74 75 76 77 78 79 80 81 82 @PostMapping("/returnPayAsynchronousFromApplePay") public boolean returnPayAsynchronousFromApplePay (@RequestBody Map<String, String> postData) logger.info("收到来自苹果支付的回调请求: {}" , postData); String signedPayload = postData.get("signedPayload" ); if (StringUtils.isBlank(signedPayload)) { logger.error("非法请求!" ); return false ; } dealAsyncResultFromApplePay(signedPayload); return true ; } public void dealAsyncResultFromApplePay (String signedPayload) JSONObject payload = verifyAndGet(signedPayload); logger.info("解签后的 [signedPayload] 数据:{}" , payload); JSONObject data = payload.getJSONObject("data" ); String signedTransactionInfo = data.get("signedTransactionInfo" ).toString(); JSONObject transactionInfo = verifyAndGet(signedTransactionInfo); logger.info("解签后的 [signedTransactionInfo] 数据:{}" , transactionInfo); String transactionId = transactionInfo.get("transactionId" ).toString(); String originalTransactionId = transactionInfo.get("originalTransactionId" ).toString(); String productId = transactionInfo.get("productId" ).toString(); String environment = data.get("environment" ).toString(); String notificationType = payload.get("notificationType" ).toString(); if ("ONE_TIME_CHARGE" .equals(notificationType)) { } else { logger.warn("notificationType: [{}],不做处理..." , notificationType); } } public JSONObject verifyAndGet (String signedPayload) DecodedJWT decodedJWT = JWT.decode(signedPayload); String header = new String(Base64.getUrlDecoder().decode(decodedJWT.getHeader())); String x5c = JSONObject.parseObject(header).getJSONArray("x5c" ).getString(0 ); PublicKey publicKey = getPublicKeyByX5c(x5c); Algorithm algorithm = Algorithm.ECDSA256((ECPublicKey) publicKey, null ); try { algorithm.verify(decodedJWT); } catch (SignatureVerificationException e) { throw new RuntimeException("签名验证失败!" , e); } return JSONObject.parseObject(new String(Base64.getDecoder().decode(decodedJWT.getPayload()))); } private PublicKey getPublicKeyByX5c (String x5c) byte [] x5c0Bytes = Base64.getDecoder().decode(x5c); try { CertificateFactory fact = CertificateFactory.getInstance("X.509" ); X509Certificate cer = (X509Certificate) fact.generateCertificate(new ByteArrayInputStream(x5c0Bytes)); return cer.getPublicKey(); } catch (CertificateException e) { throw new RuntimeException("签名验证失败!" , e); } }
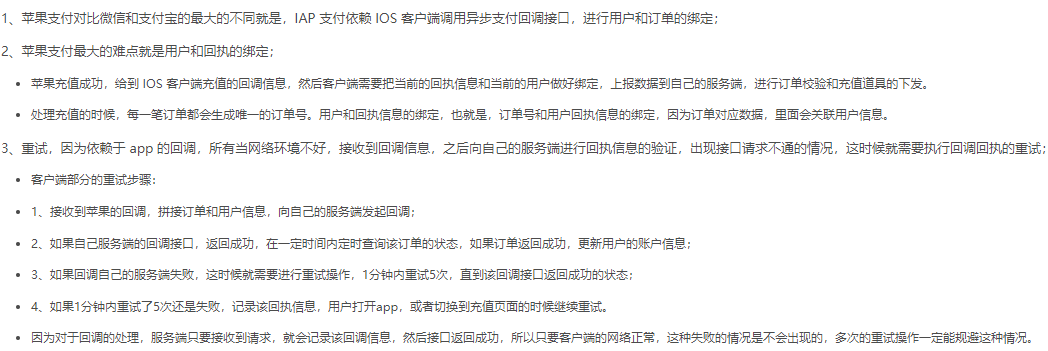
异常情况的处理 如果支付完成后 App 请求服务端失败,导致 [苹果交易ID] 和 [自定义订单] 没有绑定,那么后续的权益发放将不会进行,也就是虽然用户支付成功了,但是并没有收到对应的权益。需要对这种异常请开干进行补偿处理,建议阅读:苹果支付有哪些坑,为什么苹果支付比支付宝和微信容易丢单?
除此之外,服务端在进行支付校验时,还需要完善校验逻辑,productID、BundleID、支付金额 这些信息都要校验,并且要保证 TransactionId 不会被重复绑定。
相关文章:iOS 内购处理方案与流程的探究
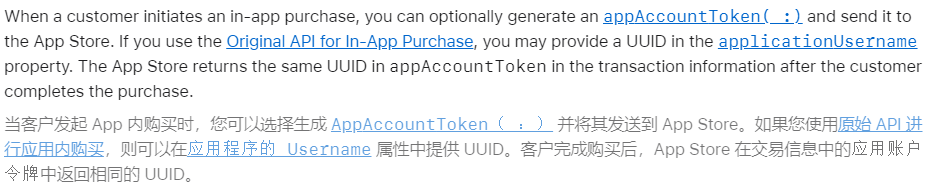
Apple StoreKit 2 上面提到,支付宝和微信支付的支付回调中携带了自定义的订单ID,而苹果支付回调没有携带,因此需要App主动请求服务器完成 [苹果支付ID] 和 [自定义订单ID] 的绑定。在阅读文档时,发现Apple是支持传递这个 [自定义订单ID] 的,见 appAccountToken 。这个特性是Apple StoreKit 2 新引入的,只要App开发时接入了这个,那么在发起支付时就可以传递这个值。
看到文档中提到,SotreKit 2最低支持版本是IOS15,产生了一个疑问:如果用户的系统低于IOS15,Storekit2可能就无法用了?调查之后发现确实是这样,那么App端接入了StoreKit 2,还需要保留StoreKit1,也就是说App端需要使用两套代码:用户系统是IOS15以下,使用StoreKit1的代码;用户系统是IOS15以上,使用StoreKit2的代码。
具体接入处理参考:StoreKit2 实际接入时候的踩坑与解决实录
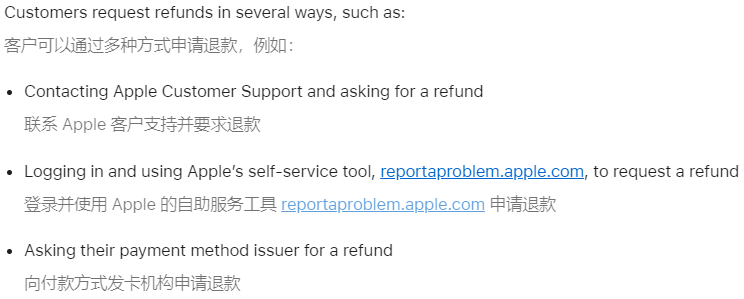
处理苹果内购退款 之前对接的支付宝和微信支付,退款操作都是需要通过服务器中转才能发起的。但是苹果比较特殊,商家不能发起退款,退款只能由用户发起,并且这个操作不会经过商家服务器,用户的退款申请会直接发起到苹果,苹果客服审核通过,会直接打款给用户,具体见这篇文档:Handling refund notifications 。文档中提到,用户可以通过下面几种方式发起退款:
上面提到的第2种退款方式,操作步骤参考文档:针对从 Apple 购买的 App 或内容请求退款
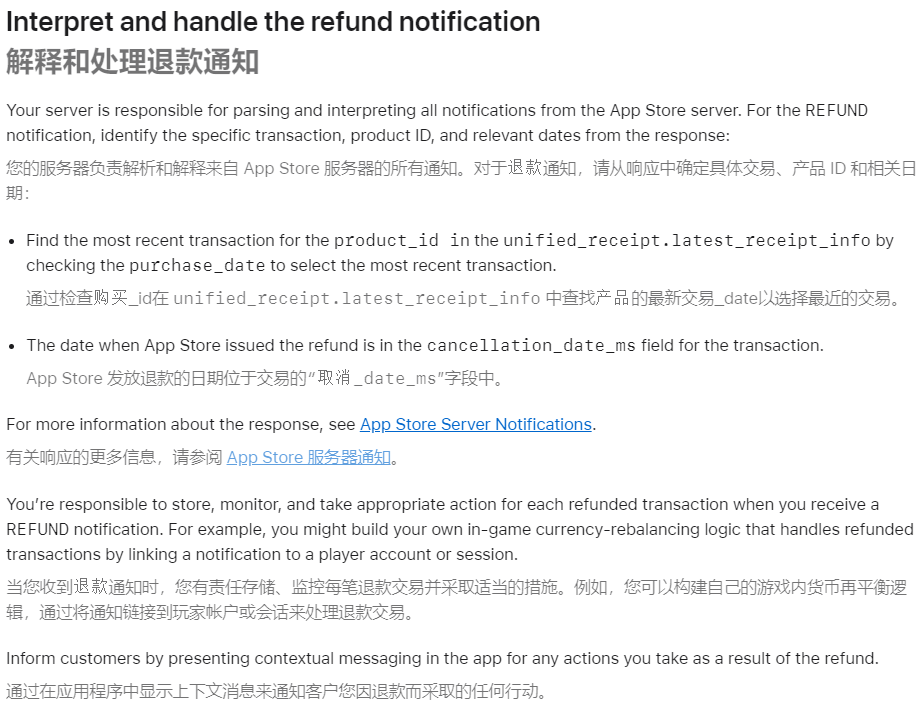
用户可以不经过商家直接向苹果发起退款,如果退款成功,那商家就等于是被薅羊毛了。因此商家有必要对用户发起的退款订单做出响应,苹果官方提供的方法是,监听苹果回调的退款通知,然后执行相应的逻辑:
上面讲的是 在用户退款成功后,苹果服务器会给商户服务器发送一个回调请求 。在 Send Consumption Information 这篇文档中了解到,用户发起退款时,苹果服务器也会给商户服务器发送一个回调请求 。商户服务器收到这个请求后,可以在12小时内给苹果服务器反馈一些协助退款的信息,这个信息苹果只做参考用。个人认为这个反馈操作可有可无,但商户服务器可以通过这个回调请求来获取有哪些用户发起了退款请求。
目前考虑苹果内购退款的整体逻辑按下面的步骤处理:
用户向苹果发起退款。
苹果收到退款请求,给服务器发送通知,服务器在日志中记录发起退款的用户的信息。
苹果同意退款,用户成功收到苹果的打款。服务器收到苹果回调的通知,对用户进行退款成功后权益收回的操作。
对于退款期限,苹果并没有明确的说明,网上找到的说法是90天可以申请退款。苹果的这种退款机制,很容易出现用户恶意退款薅羊毛的情况(搜索关键词:苹果 退款 羊毛 )。这种情况在我们的App中也可以找到对应的案例:用户购买了云豆,然后用云豆购买了礼物送给其他人,云豆余额变为0之后,该用户向苹果申请退款并成功收到了退款。这种情况考虑按如下逻辑处理:仍然按正常逻辑对该用户的云豆余额进行扣除,但这会导致用户的云豆余额变为负数。如果之后开放了VIP服务,用户在VIP到期后向苹果申请退款并且成功,这种情况也需要考虑。
参考文档:对接苹果支付退款退单接口
转账红包功能接入IAP 在 App 审核指南 - Apple 文档中,其中 [3.2.1-应做事项] 中提到如下内容:
而我们 App 中的红包功能,似乎满足上面说的两种情况,因此应该无需接入 IAP。
IAP功能测试 参考文档:IAP支付测试
参考文章 苹果应用内购买(IAP),服务器端开发处理流程
苹果应用内购买(IAP)—从入门到放弃
iOS应用内购买In-App-Purchase流程及前后端交互流程
Java接入苹果支付
In-App Purchase 服务端接入实用技术
Validating receipts with the App Store deprecated - stackoverflow
When will the verifyReceipt api be deprecated?
想抄作业了,有没有 Apple 内购的后端设计方案
Apple Storekit2 服务器API升级 (Apple开源内购库) (已上线)
使用Java接入苹果内购流程(附主要代码)
app-store订阅消息开发\内购票据验证
iOS 内购处理方案与流程的探究
ApplePay 服务端单据验证